
As an Amazon Associate I earn from qualifying purchases.
A flat tire always seems to happen at the worst moment: on the way to work, in the rain, or miles from the nearest shop. Knowing how to change a tire yourself turns a stressful breakdown into a 20-minute roadside fix. This guide walks you through every step, from parking safely to tightening the last lug nut, so you can get back on the road with confidence. You do not need to be a mechanic. With the spare tire, jack, and lug wrench that came with your car (plus a couple of smart upgrades we recommend below), any driver can handle this job.
Table of Contents
Quick Pick: The 3 Tools That Make Tire Changes Easier
| Overall Winner | Best Budget | Premium Pick | |
|---|---|---|---|
| Product | Gorilla Automotive 1721 Telescoping Lug Wrench | EPAuto 1/2″ Click Torque Wrench | Powerbuilt 620479E 2-Ton Floor Jack |
| Why | Telescoping handle extends to 21 inches for serious leverage on stubborn lug nuts; compact enough to live in your trunk | Click-type torque wrench (10-150 ft-lb, ±4% accuracy) so you tighten lug nuts to spec instead of guessing | Low-profile floor jack (2-3/4″ to 15-1/2″ lift range) that lifts faster and more stably than any factory scissor jack |
| Get it | Check Price on Amazon | Check Price on Amazon | Check Price on Amazon |
Safety First: Before You Touch a Lug Nut
Changing a tire on the roadside puts you close to moving traffic, so safety comes before speed.
- Get fully off the road. Pull onto the shoulder, a parking lot, or the flattest, firmest ground you can find. Never change a tire on a soft shoulder, a slope, or a curve with poor visibility.
- Turn on your hazard lights. Day or night, hazards tell other drivers you are stopped. At night, keep headlights on and set out reflective triangles or flares if you carry them.
- Apply the parking brake. Every time, no exceptions. If your car has a manual transmission, leave it in first or reverse gear. Automatics go in Park.
- Chock the opposite wheel. Wedge a rock, a brick, or a proper wheel chock behind the tire diagonally opposite the flat. This stops the car from rolling while it is jacked up.
- Keep passengers out of the car. Everyone should stand well away from the road, behind a guardrail if one is available.
- Never crawl under a car supported only by a jack. The jack is for lifting, not for holding. If you need to get underneath for any reason, use rated jack stands.
Tools You Need to Change a Tire
Most cars ship with the basics in the trunk, usually under the cargo floor mat or behind a side panel:
- Spare tire (full-size spare or compact “donut”)
- Car jack (typically a scissor jack)
- Lug wrench (the short L-shaped tool from the factory kit)
- Owner’s manual (shows jack points and lug nut torque specs)

Smart upgrades worth keeping in the trunk:
- Telescoping lug wrench (far more leverage than the factory tool)
- Torque wrench (tightens lug nuts to the correct spec)
- Wheel chock (cheap insurance against rolling)
- Reflective triangles or LED flares (visibility at night)
- Work gloves and a kneeling pad (roadside comfort)
- Tire pressure gauge (check the spare before you need it)
How to Change a Tire: The 10-Step Process
Step 1: Park on flat, solid ground
Find level pavement away from traffic. Engage the parking brake, shift into Park (or first gear for a manual), and turn on the hazards. Place your wheel chock or a heavy rock snugly against the tire diagonally opposite the flat.
Step 2: Gather your tools and spare
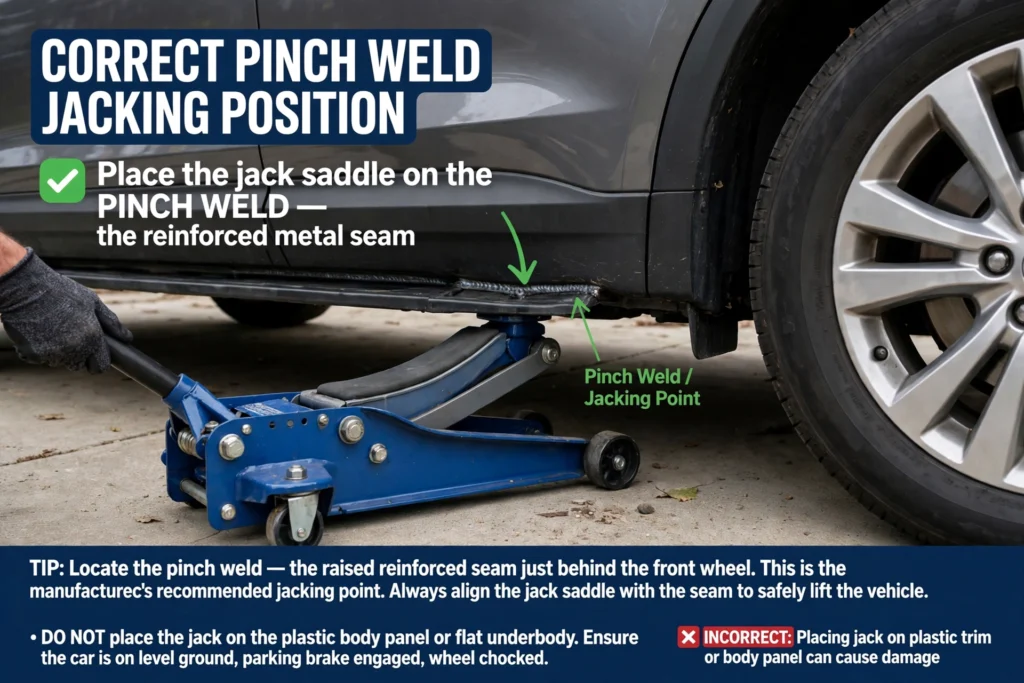
Pull out the spare, jack, and lug wrench. Give the spare a quick look: it should be inflated and free of visible damage. Your owner’s manual shows exactly where the jacking points are on your car’s frame or pinch welds. Using the wrong spot can damage the body or let the car slip.
Step 3: Loosen the lug nuts (do not remove yet)
Fit the lug wrench onto a lug nut and turn counterclockwise. Loosen each nut about a half turn while the tire is still on the ground. The weight of the car keeps the wheel from spinning. If a nut will not budge, stand the wrench handle at roughly the 9 o’clock position and press down with your foot, or use a telescoping wrench for extra leverage. Do not use a cheater pipe that could snap the stud.
Step 4: Position the jack
Slide the jack under the manufacturer-specified jacking point nearest the flat tire. For most cars this is a reinforced section of the pinch weld just behind the front wheel or ahead of the rear wheel. The jack must sit squarely on solid ground with the saddle centered on the lift point.
Step 5: Raise the car
Pump or crank the jack slowly until the flat tire is about 2-3 inches off the ground. You only need enough clearance to remove the flat and mount the spare. Keep your body clear of the area under the car.
Step 6: Remove the lug nuts and the flat tire
Finish unscrewing the lug nuts by hand and set them somewhere they cannot roll away (a hubcap or a small tray works). Grip the tire with both hands and pull it straight off the hub. If it sticks, a firm push on the top edge usually breaks it free. Lay the flat down flat-side down so it cannot roll.
Step 7: Mount the spare
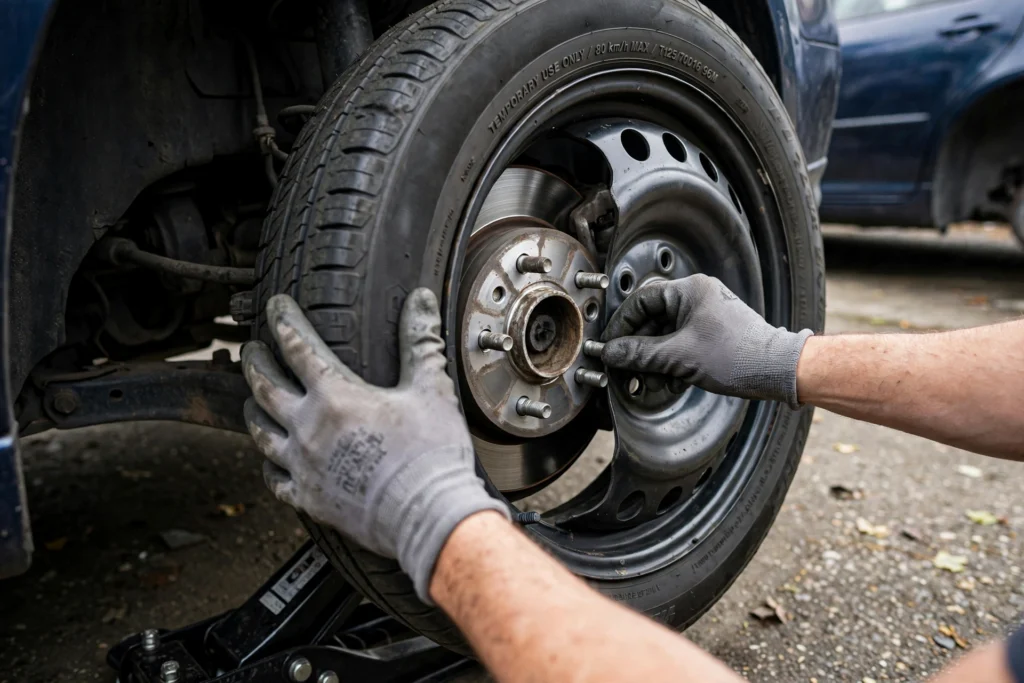
Lift the spare onto the hub, lining up the bolt holes with the wheel studs. Push it on as far as it will go by hand.
Step 8: Hand-tighten the lug nuts in a star pattern
Thread each lug nut on by hand first to avoid cross-threading. Then snug them in a star (crisscross) pattern: tighten one nut, skip the next, tighten the following one, and continue around. This seats the wheel evenly against the hub. Do not fully tighten yet.
Step 9: Lower the car and tighten to spec
Lower the jack slowly until the spare touches the ground and bears some weight, then remove the jack. Now tighten the lug nuts fully, again in the star pattern, using the lug wrench. If you have a torque wrench, set it to your vehicle’s spec from the owner’s manual (commonly 80-100 ft-lb for passenger cars; trucks often higher). Proper torque matters: too loose and the wheel can wobble; too tight and you risk snapping a stud.
Step 10: Stow everything and check your work
Put the flat, jack, and tools back in the trunk. Remove the wheel chock. Double-check that each lug nut is tight, then drive carefully to the nearest service station. Have the spare’s pressure checked and the lug nuts re-torqued after 50-100 miles, which is the standard recommendation from tire professionals.
Tips for a Smooth Tire Change
- Check your spare twice a year. Compact spares lose pressure over time. A flat spare helps nobody.
- Practice once at home. Doing a dry run in your driveway means the roadside version takes 15 minutes instead of 45.
- Keep the owner’s manual in the car. Jack points and torque specs vary by model; guessing is how body panels get bent.
- Replace, do not repair, a damaged sidewall. A puncture in the tread can often be patched by a shop; sidewall damage means the tire is done.
- Retorque after 50-100 miles. Lug nuts can settle after a wheel change. A quick re-check with a torque wrench is cheap insurance.
- Do not use impact tools on locking lug nuts unless you have the correct key socket; you will round them off.
Frequently Asked Questions
How long does it take to change a tire?
Once you know how to change a tire, the job typically takes 15-30 minutes. Your first attempt may take closer to 45 minutes, especially if a lug nut is seized. Practicing once at home in daylight cuts the roadside time dramatically.
How far and how fast can I drive on a spare tire?
A compact “donut” spare is for temporary use only: most manufacturers limit it to 50 mph and roughly 70 miles of driving. It is smaller and narrower than your regular tires, which affects handling, braking, and ground clearance. Get the full-size tire repaired or replaced as soon as possible. If your car came with a full-size spare, normal driving limits apply, but still have the original tire fixed promptly.
What size lug wrench do I need for my car?
Most passenger cars use 17mm, 19mm, or 21mm lug nuts, but it varies by make and model. A telescoping lug wrench with interchangeable sockets (such as the Gorilla 1721, which includes the common sizes) covers nearly every vehicle and gives you far more leverage than the short factory wrench.
Do I need to retorque the lug nuts after changing a tire?
Yes. Tire professionals recommend re-checking lug nut torque after 50-100 miles of driving. Wheels can settle slightly after installation, and a nut that felt tight on the roadside may need a final snug. This is where a click-type torque wrench earns its keep.
What if the lug nuts will not budge?
First, make sure you are turning counterclockwise and the car is still on the ground. A telescoping lug wrench extended to full length multiplies your leverage substantially. As a last resort, careful foot pressure on the wrench handle (at the 9 o’clock position) usually breaks them free. Never use heat or a hammer on the wrench, and never stand on a wrench while the car is jacked up.
Is it safe to change a tire on the side of the highway?
It can be done, but it is the riskiest scenario. Get as far off the travel lanes as possible, keep hazards on, and set reflective triangles behind the car if you have them. If the shoulder is narrow, traffic is heavy, or visibility is poor, the safer choice is to call roadside assistance. No tire change is worth standing inches from 70-mph traffic.